The loss of my trusty, semi-retired MacBook Pro, as a result of its impromptu shower on the Round The Island Race, had forced me to consider alternative methods of chartplotting.
I had a good look around at the alternatives, which needed to satisfy three requirements:
- portability, for use on different boats;
- the ability to be mounted, as the old MBP had been, inside the sheltered companionway of Arabella, where it could be seen from the helm; and
- (in contrast to the MBP) the ability to be carried round on deck, specifically when racing. Previously, I had used my iPod Touch out on deck, connected via wifi to the MBP below decks, using iTeleport and Jaadu VNC. It had been fiddly controlling the MBP from the iPod's small touch screen, and the battery drain on the iPod as a result of using the wifi had rendered it untenable for longer races such as the RTI. In any case, the kids had stolen the iPod, and even if I retrieved it, I had nothing on which to run PassagePlus unless I was willing to risk my current MacBook Pro suffering a similar fate to the old one, which had been kept as a spare.

My research kept leading me back to the iPad 2. Despite being a Mac enthusiast, I have to admit that when the iPad was first launched, I couldn't see the point of it. It had seemed to me like an over-sized iPhone, except of course that it lacked the phone. I don't even like iPhones - I'm a BlackBerry man myself.
But I couldn't deny that the sheer number of navigation apps readily available for the iPad 2, coupled with its combination of portability, generous touchscreen and a 10-hour battery life, made it a pretty compelling proposition, all at a favourable price compared with a cheap MacBook or a used Toughbook tablet.
I took a deep breath, forked out the necessary funds and, a fortnight later, opened a package from Apple containing a 32GB iPad with WiFi and 3G. A bit of judicious shopping around in the murkier corners of the internet meanwhile had resulted in a bargain-priced, pre-loaded Pay As You Go SIM card for much less than the network wanted to charge me for it - I was determined not to get a contract - and I was off and running.
Choosing the right model of iPad
If you plan on using navigation apps, it's important to get the right model of iPad 2 - the one that contains a GPS receiver! There seems to be a lot of confusion over whether the WiFi-only model has GPS capability, but according to Apple, it doesn't. Apple's support pages contain the following summary:
"Depending on your iPad model and available services, Location Services uses a combination of Wi-Fi, cellular, and GPS to determine your location:
- iPad Wi-Fi only uses Wi-Fi for Location Services (when a Wi-Fi network is available).
- iPad Wi-Fi + 3G can use Wi-Fi, cellular, and GPS. If you're not within line of sight to GPS satellites, iPad Wi-Fi + 3G can determine your location using Wi-Fi. If your iPad is not in range of a Wi-Fi hotspot, it can determine its location using cellular towers."
So that'll be the WiFi + 3G model you want, then, unless you want to fork out for a separate GPS receiver.
Is it really GPS-enabled?
Further confusion stems from the fact that the iPad uses 'assisted GPS' (A-GPS). At the time of writing, the internet discussion boards continue to buzz with debate over whether there's a real GPS in there, or a pretend one in which the iPad uses triangulation from cellphone towers to simulate the effect of a GPS.
DYOR - but I don't think there is any doubt that the iPad 2 Wifi + 3G contains a true GPS receiver, and that the 'assisted' nomenclature connotes simply that the unit uses triangulation from the 3G tower network to get a head start in finding its location while it slowly acquires sufficient satellite signals. It's not clear whether it's WAAS-enabled, however. People have been experimenting with the 3G and WiFi switched off, and report that the unit does indeed get a GPS fix; although some do say you might want to go off and make yourself at least a cup of tea and perhaps a bite to eat while it does so. Times of as long as 12 - 30 minutes have been reported to get a fix, and only then in unobstructed positions with good line of sight to the sky. That last factor isn't usually a problem on a boat, of course, but the time taken to get a fix could still be an issue if you ever need to know quickly where you are.
Since I struggle to get out of the Solent just once a year - and
Arabella hasn't left the Solent for the last two sailing seasons - I don't personally consider this to be much of a problem. I'm always within range of a 3G signal. You may feel differently if your sailing takes you further offshore or into areas of weak or no cellphone coverage. Fortunately, if you don't mind spending even more money, there are at least two workarounds:
- The first is to acquire a separate GPS unit that either plugs into the iPad or, better, connects via bluetooth: the GNS 5870 GPS Bluetooth Receiver is the sole current example of the latter available in the UK, and is getting good reviews; in the US, a further option is the Dual XGPS 150. Alternatively, if you think you can live with the plug-in variety, and it won't mess up the way in which you plan to mount your iPad onboard, then check out Bad Elf.
- The alternative, which I'm playing with and will report on in a later post, is to transmit NMEA data from your boat's onboard GPS (assuming it has one) to the iPad via WiFi. There are a few products on the market that do this - essentially by combining a multiplexer with their own personal WiFi hotspot - but the one I am going to try is the iAIS produced by Digital Yacht. This is a dual function AIS receiver and WiFI-enabled NMEA multiplexer. It's an expensive option compared to picking up a separate GPS receiver, but then, you are getting access to all the ship's onboard data - not merely the GPS location - and an AIS feed to boot. As I say, more on that in another post.
(It's worth noting in passing that these workarounds have certain other advantages. If you have a Wifi only iPad, they provide you with GPS data, admittedly at higher cost than simply paying the extra for the 3G enabled iPad to begin with. Even if you do have the WiFi + 3G model, you should be aware that 3G roaming costs are prohibitively high; these solutions permit you to switch off the 3G when you go foreign, yet still get a GPS signal perhaps more quickly than with the onboard GPS alone.)
Saving the iPad from drowning
As my late, lamented MacBook Pro bears witness, Apple products are neither waterproofed nor ruggedized. Drop it or soak it, and it'll likely be history. I've got plenty of those clear plastic waterproof pouches, but I wanted to go one step further to protect my investment. Otterbox and Griffin both produce ruggedized cases for the iPad 2. After some research, I opted for the
Griffin Survivor pictured below, which seems more protective and more water-resistant than the
Otterbox Defender case, despite being a little bit cheaper.
Bear in mind that 'water-resistant' means just that - the Griffin case is designed to meet or exceed US military specifications that require it to withstand windblown rain/spray at 200mm per hour, for one hour. It won't resist immersion, which means that a basic clear plastic pouch will still come in handy.
Mounting the iPad onboard
There are plenty of aftermarket suppliers of iPad mounts for vehicles, aircraft or boats, so you bound to find something to suit your needs and budget. In my own case, in the interest of cost and convenience, I wanted to exploit an existing
RAM Mount that had been installed, originally, to hold the MBP. I simply needed to modify that to hold the iPad as shown in the image below. (I selected the
RAM Tab-Tite because it was specifically designed to hold an iPad
inside its protective case. At £35 it wasn't cheap for just one small component of the mount system, but as I already had all the other components I needed from the original laptop mount installation, that was the total cost).
[Image pending]
The important thing is not so much the type of mount you use, but where you choose to locate the iPad. I'm a fan of sucker mounts, but tempting as it may be to keep it simple and just use a sucker mount in the cockpit, the fact is that the iPad's reflective screen and relatively poor brightness make it hard to read in bright daylight. Sheltering the unit in the shade of the companionway hatch, and ramping up the brightness setting (the factory default is 50%) rendered it workable for me - but then, Arabella has a small cockpit and the iPad can be easily seen from the helm when mounted in that position.
iPad Chartplotting Apps
The following isn't a comprehensive review of every iPad chartplotting App, but it's a pretty good selection of what appealed to me when I browsed through the App Store in iTunes:
- iChart (Solent)
- Marine Imray Charts: English Channel
- Navionics HD UK & Holland
- Memory Map (Free version)
- iNavX
The first three of these Apps include the marine charts for their stated areas, and therefore represent the choice for those who want everything they need in the way of charts and software in a single-click download from the Apps store. In contrast, Memory Map (free) and iNavX (paid) require you to obtain charts for your area independently and at additional cost, but provide you with direct links to chart resellers so that you can buy and download from within the App.
Bear in mind, I'm not a professional reviewer, just a punter who paid for the Apps like anyone else would, and these are my reactions as a pretty average, relatively computer-unsavvy, user. The screenshots below were all captured from my iPad while playing with the Apps.
Some brief introductory points:
- All of the chartplotter Apps reviewed below store the charts on your iPad. The charts can be accessed without an internet connection, once you've purchased and downloaded them. But it would be advisable to do your chart downloading at home on your wifi, before you set off for the boat.
- Consider investing in a capacitive stylus with which to tap on the screen instead of your finger. Not only does it save the screen from smears and smudges, it's also a lot more accurate for selecting and moving items on screen - which you'll be doing a lot of if you use these Apps.
- Clicking on an image below brings up a larger version. The landscape images blow up to pretty much iPad screen size, and therefore provide a good sense of the clarity of the the charts, symbols and menu in real life.
iChart Solent
This is, essentially, a pack of 36 Admiralty-based Raster charts which you can purchase by area (in this case, the Isle of Wight, the Solent and Southampton Water, including the "Approaches" charts and the harbour and river chartlets), packaged inside a navigation App. You could think of it as an electronic version of the small craft folio you're most likely to want if you're based in this area, coupled with the basic means of viewing them and your position on them.
I desperately wanted to love this App. I much prefer Raster charts over Vector charts; especially if they're the Admiralty charts that I learned to navigate with, and use to this day. And I kind of
do like this App, in the sense that it lets me see
Arabella's position and track plotted on an Admiralty chart.
There's no denying that the App looks beautiful, with a very simple, classy interface. Scrolling and zooming, using your fingers on the touchscreen, are easy and smooth. There's only a top toolbar, and essentially clicking on the
i button gets you into all the functions. The little symbol buttons, top right, permit you toggle on or off the overlays showing (or hiding) the boat's position, waypoints, routes and track. In the centre of the toolbar are displayed your position, course and speed (in mph, though).
But...there are quite a few buts. To begin with, can you see Arabella nestling in the marina, above? Not easy to find, is she? She's the small, grey boat outline sitting dead centre in the screenshot. Why, oh why, did the developers do that (they're not alone, by the way, as we shall see)? Do they really think that I want to play
Where's Wally? on a small, not especially bright screen while trying to sail at the same time? There seems to be no option to change the icon, so you're stuck with it.
Considering the limitations of the iPad's screen in bright daylight, this a real defect: you cannot assume that you can just glance at the iPad and see instantly where you are. (Hint: if you're reading this post on an iPad, pinch and zoom in on the image above so that it fills your screen. Then take it outside and see what you think.).
It stands to reason that a navigation app which retails for tens, rather than hundreds, of pounds - including charts - is going to be a compromise. It's not likely to offer you anything like the range of features that either a dedicated or laptop chartplotter will provide. I wasn't surprised that the iCharts App had no means of importing NMEA data, for example, but depends solely on the iPad's A-GPS. Nor would I necessarily have expected the ability to import and overlay GRIBs. But it honestly came as a shock to me to find that, while this App had a feature for setting up a route between two or more waypoints - there was no way to follow the route! For sure, it'll give you the bearing and range to a selected waypoint, but there's no course to steer, rolling road, cross-track error or similar function. All you can do is squint myopically at the screen to see if your faint little grey boat outline is more-or-less tracing a course along the route. Hopeless.
No complaints about the ease of inputting waypoints and routes. It's instant and intuitive: two taps on the screen in the desired location plants a little waypoint flag, and two clicks on the menu gets you to the route setup screen from which you select the waypoints that will comprise the route. Both the waypoint symbols and the route line are bold and clear - easily visible on the screen even in bright daylight.
I have to admit, in all fairness to iChart, that my expectations have been raised somewhat since I first started using
PassagePlus on the MacBook Pro. Then, all I wanted to do was see where I was, add the odd waypoint and be told distance and course to steer. I would do the rest. In truth, that probably still is mostly what I'd want and do. But since being exposed to racing in recent years, I now see the benefits of having not only a predetermined route round the marks, but also a method of seeing cross-track error (XTE) and other data relevant to my progress to the next waypoint. In these respects, iChart falls short.
Lastly, being rasters, the charts do of course show the Admiralty tidal diamonds. If you like, you can even scroll across each chart to read off the tidal streams from the printed table, as shown below. But that's all: there's no interactivity built-in to the App. There's nothing to click on to show you the tide levels, and indeed there are no tide levels included, unless you want to read off the printed tidal curve and do things the traditional way. With one exception, this isn't all that big a deal, as I describe in more detail later in this post, but it's worth noting. The exception is if you want the App to take into account tidal vectors in computing a course to steer. In
PassagePlus, you have the option of entering the tidal diamond data manually from the chart into the program - a laborious but once-only undertaking - so that it takes the tidal vector into account. None of the Apps featured here offer that facility.
Verdict: On the plus side, the iChart App is simple, pretty and uses Admiralty Rasters. You would certainly use it for basic passage planning, assuming you had access to tide data from an almanac or elsewhere, and for basic navigation on board, of the seeing where you are and where you're going variety - but that's about it. There is no facility to import or export data (such as GRIBs, waypoints, routes and/or tracks). There is no GOTO feature and no supporting data (such as XTE) to assist you in following a route. The absence of more advanced features means that iChart is the weakest contender among this group of Apps. It's also not competitively priced, given the restricted chart area and the lack of features.
Marine Imray Charts: English Channel
This contender carries the Imray name, which is a good start. Imray's charts don't appeal to me as much as Admiralty Charts, but I can live with them and I appreciate that many people prefer them. Like iCharts, above, this App is a portfolio of Raster charts contained in a navigation software wrapper. The selection of charts is generous, covering the entire Channel on both the French and UK sides, as well as the Channel Islands, with some harbour and river chartlets. This represents good value for money and will certainly appeal to the completists, although Imray's chart catalogue doesn't truly match the Admiralty folios if you want real detail on a specific area.
There's quite a neat, Apple-style, rolodex chart selector and overall the look and feel of the App is attractive. Manipulating the App with your fingers on the touch screen is easy and smooth: scrolling and zooming are commensurate with iCharts, and the soft buttons seem slightly more sensitive, but not overly so.

There's no question that the Imray App is a step-up from the iCharts App in terms of functionality. There are two toolbars - top and bottom - and generally a more professional and businesslike feel to the whole product. But, alas, this App also has its shortcomings.
It seems only fair to start with a comparison against iChart's GPS location symbol. Is it any more visible in Imray?
Er, no. In fact it's slightly less visible - a simple light orange boat outline. Can you see it? You'll have to squint. I'm sure it complements Imray's pastel-hued palet very tastefully, but it's damn near invisible, and in bright daylight you can forget it. How ridiculous is that? And by the way, Imray, if this is an up-to-date chart why are you still showing the old pontoon layout at Shamrock Quay, when it was reconfigured at least 6 or 7 years ago? Every other chartmaker seems to have noticed by now. It's all very well advertising that "the application includes charts corrected up to February 2011 and corrections until February 2012, which will be issued as free updates," but what else haven't you been updating in your charts?
Assuming you can live with these problems - and I'm not sure that I can - then what does the Imray App give you that iCharts doesn't? Well, for starters, to quote from their blurb:
- Magnetic compass
- Distances, bearings from any point to any point
- Electronic bearing line
- Tides with full functionally from Tides Planner (which you need to buy separately if you want to see more than one day's tides)
- Aerial photographs (subject to coverage)
These are pretty useful extras, with the arguable exceptions of the compass - more on that below - and the aerial photos, which feel like a cheap attempt to add some kind of multimedia functionality just for the sake of it. If, nevertheless, this is the kind of thing you're into, then you simply tap on the little camera icons that you can see on the chart in the background.
Also visible on the background chart above are the little blue diamonds that signify the availability of tidal data. You do need to purchase and download the separate Tucabo
Tides Planner App from Imray, however, if you want to look at the tides on any day other than today - a bit of a limitation when it comes to passage planning. That said, forking out the extra is worthwhile, if you intend to go with this App, because Tides Planner is fully integrated with the App. Tapping on one of the blue diamonds brings up a pretty handy set of data. Part of it comprises the usual curve, with optional adjustments for your boat's draft and a sliding scale on the right that can be used to calculate the actual depth of water for a given chart datum. Using it isn't quite intuitive but with a little practice, I got the hang of it.
Flipping the screen over (using the soft button at the bottom right) access the tide tables which, if you've paid the extra for the Tides App, give you a look forward capability. Tapping on the arrows to the right of each date gives access to the same style of the curve as above for that date.
The "magnetic" compass (which I doubt it is) seems gimmicky and, when tested from my roof terrace at home, it was wildly variable and inaccurate. Given that this location is pretty much free from any magnetic interference, it didn't give me much cause to believe I'll be dispensing with a real compass anytime soon. It does have a purpose, though, in relation to route-following. I'll return to that below.
The other functions, such as the ability to measure distance and bearing between two points, were useful and simple enough to use, no thanks to the "user manual", which reads more like a features list than a set of instructions. However, it's all fairly intuitive and after fiddling with the App for a while, you'll figure it out. A particularly nice feature was the option to tinker with the distance and bearing display in the top left-hand side of the screen, which also displays course and speed from the iPad's A-GPS. However, there is no facility to import NMEA data, for example from the ship's GPS.
Which brings us, at last, to the Imray App's capabilities with waypoints and routes. It isn't perfect, and nor is using it intuitive - and that useless manual doesn't help here - but it is more functional than iCharts. The easiest way to explain it is to use screenshots from my attempt to set up and use a route while passage-planning at home. Okay, I admit it - I also want to keep this record so I can remember how the hell to do it next time.
In the shot below, I'm located in the main channel exiting Portsmouth Harbour (because I'm at home, I'm not using my GPS position but have created a pretend position, signified by the blue diamond symbol). I want to turn to starboard and run down the Swash channel over Spit Sand, following the transit shown on the printed chart. I've created three waypoints, starting with "Test 1" which is on the transit for the Swashway. Using GOTO to head for that waypoint will keep me safely on the transit, as long as I am on it to begin with, as I am here. Once I reach "Test 1", I can safely depart the transit, and I've set up a route to do so. "Test 1" sits on a white circle, denoting that it's the start of the route, and the third waypoint sits on a black circle, indicating that it's at the end. Intermediate waypoints sit on grey circles.

As you can see, the line showing the route is a bit thin and weedy, and won't be easy to see in bright daylight. The three waypoints comprising the route are clear enough, however. Now we need to follow the route, and the first step is to get to "Test 1" as that is where the route starts. Tapping twice on "Test 1" opens up a context-sensitive menu.
The obvious choice is GO TO, and sure enough, a little red target appears on "Test 1". The left hand end of the upper toolbar now shows my current position (at the blue diamond) and the distance and bearing of "Test 1" as my GOTO target. If I was actually navigating in real life, the blank panel to the right of that would show my COG (T) and SOG.
Okay, so I turn onto 229 (T) - not magnetic, note - to head for "Test 1". It's from this point onwards that I'd appreciate some feedback on whether I'm on track. After all, I am following a transit down a swashway. I want to know I'm not being taken off to one side or another by the tide or leeway. It's at this point that Imray App's deficiencies start to become clear. The intention seems to be that I use the compass feature, so I'll call it up.

Now, because I'm sitting at my kitchen table doing this, and not really out there braving the wild waters of the Swash, I've rotated the iPad so that it's pointing North up. The orange diagonal line is showing me the course to steer. If I was moving in excess of 2.5 knots, according to the manual, the little red marker on the outer bezel would be showing my heading - I'd have to squint a bit, maybe go down below to see it, but to be fair to Imray, it is there. So in real life, that little red course marker would swing round to correspond more or less to the orange course to steer line. I say more or less, because while the compass is supposedly magnetic, the blurb doesn't say whether the CTS line or the course marker are true or magnetic. I'm guessing true, though. As long as I concentrate on keeping them aligned, I should be able to stay on the transit. Hmmm, well, yes probably. But while that might be acceptable in decent soundings, wandering off a swashway is not. I want to know
how far off the transit I am - my XTE - and unfortunately, the App doesn't display that, nor other useful information such as time to next waypoint, turn after next waypoint and so on.
Assuming that I manage to follow the transit successfully, I will in due course arrive at "Test 1", the first waypoint in my route. Tapping twice on the waypoint, I call up the menu shown above, but this time I select GO TO NEXT. Waypoint 2 now becomes the destination and is painted by the red target; its bearing and range appear in the upper left toolbar corner; and on the compass, the orange course to steer line obligingly swings round to show the new course to steer. And off we go again.
As far as I can make out, there's no facility for the destination to switch automatically to the third and final waypoint on the route, once we arrive at or within a preset proximity of waypoint 2. It's necessary to tap twice on waypoint 2 and pick GO TO NEXT from the pop-up menu again.
Verdict: Would it be too harsh to say that this is probably a choice for Imray enthusiasts only? Even they should take note of the App's shortcomings: a less-than-adequate user manual; a foolishly designed GPS position indicator that's too faint to see in bright daylight; the necessity to buy the Tides App to access future tidal predictions; and a somewhat rudimentary route-following function. Although it's nicely interactive and better-featured than iChart, I don't find the Imray App to be a terribly compelling offering compared to the alternatives described below.
There's no denying that this is a handsome App, with a classy, integral look and feel that goes well with the printed Imray charts on which it is based. But I can't help but harbour the suspicion that the developers placed a higher priority on that than on how useful the App would be in real life. From here on in, the Apps become more business like - less focused on appearance and style, more on functionality.
Navionics HD UK & Holland
Ugh! Vector charts...deep breath.
Let me say first off that, in terms of raw chart coverage, Navionics' proprietary App represents tremendous value. You get the entire British Isles and the French channel coast, as well as Belgium and The Netherlands, too. If this includes your sailing area, then you're never likely to need to look elsewhere for electronic charts. You need to download them (free of charge) after installing the App, but as long as you're on a WiFi connection, that's a simple, quick and straightforward process. The image below shows the chart coverage (Area 28).
That's the good news, but how does the included navigation App shape up? Let's start off with what I'm beginning to think of as the "iChart comparison."
At last! A decent position indicator...a nice big red arrow, you can't miss it. Moving swiftly on, there's a cool overlay feature which will be familiar to anyone who's ever used Maps on the iPhone or iPad. Here it is with the Google Maps satellite overlay.
Do bear in mind though that to get the pretty overlays, you need a live internet connection. If you're running the iPad Wifi + 3G, and you're in reach of a signal, you'll be fine.
The GUI is simple enough. Big zoom in and out buttons sit up at the top right hand corner, and along the bottom of the screen is a straightforward toolbar in which the buttons do what they say on the tin.
As with all Vector charts, changing the zoom level reveals more or less detail. It's my biggest complaint about Vector charts generally, no offence intended to Navionics. On the upside, the fact that the chart is a Vector allows for a plethora of user preference settings, such as one that changes the contour colour scheme to allow for your choice of minimum safe depth. In addition, many of the features on the chart are interactive - the tidal diamonds and current diamonds, for example. Touching and holding the screen brings up a little magnifying glass feature. Drag the magnifying glass over the item you want, and a set of cross-hairs locks onto the object, like this.

In this particular case, we've found a tidal diamond. Releasing once the cross-hairs have locked on brings up a basic but elegant tidal curve, the flip side of which contains detailed tide tables. However there's no facility to set chart datum and minimum required depth, as there is in the Imray App reviewed above.
There are also current diamonds (the same as tidal diamonds, but with a "C" inside). Selecting those brings up useful tidal curent information either in the form of a curve or in tabular format.
You waste a lot of idle time, just choosing random objects in this way and seeing what turns up - a photo, say, or details of a good Thai restaurant or a marina (because Navionics has embraced crowdsourcing and lets users upload info which can be overlaid on the charts). It's diverting, but not really core.
More to the point, can you navigate a route with this App? Not as well as I had hoped, I'm afraid. On the plus side, creating a route is ridiculously simple. Click on the WP button on the toolbar, select "New Route" and just tap in waypoints where you want them on the touchscreen. It took me about 15 seconds to set up a routing through the Swash channel similar to the one I had done for the Imray App, above. Just tap, tap, tap, tap and four waypoints appeared, joined by a route.
The problem is that having input the route, all you get is a bearing and range to whichever waypoint you select on it. In the screen below, because I'm still sitting in my kitchen, I've had to use the App's (very handy) distance measuring tools, shown by the purple pins, to simulate what would happen if your GPS location was at the first waypoint. You'd select the second waypoint and at the top of the screen you would see the CTS and range, and that would be it.

There's no GOTO or XTE function, not even a little compass toy like in the Imray App. All you can do is follow the CTS and keep a close eye on the - admittedly, very clear - screen to make sure your little boat symbol doesn't stray into danger. Nor are there any other advanced functions, such as time to destination or turn after next waypoint. It beats the Imray hands down for ease of use - at the next waypoint, just tap again and your course to the following mark is set - but given that the Navionics HD App is one of the more expensive in this group, you can't help feeling short changed. You've been given a chartplotter, but less than a full navigation App.
Just to show you what it would look like if your GPS position
was on the route, here's a route I've created from my kitchen in Shad Thames, out into the River Thames and then downstream towards Chambers Wharf. As you can see, my GPS location is the first point on the route, and by selecting the second waypoint (using the magnifying glass tool), the bearing - not the CTS, mind - and distance have appeared. When my red GPS location symbol reaches waypoint 2, I'll have to repeat the process to go to waypoint 3. It's really quick and easy, but I just question why it isn't automated with a GOTO feature and why I can't see CTS, XTE and other useful data.
Verdict: The Navionics HD App is a mixed bag. It's the first App reviewed here that has a really clear GPS position symbol, and indeed all of its overlays (waypoints, routes, etc) are clearly visible even in bright daylight. It's also very, very quick to tap in waypoints and set up a route, with distance and CTS to next waypoint - which can count for a lot when you've got your hands full with sailing the boat. I'm not a fan of Vector charts, but Navionics are among the best around. The tidal data is clearly presented, if not as flexible to work with as it is in the Imray App. But why, oh why, didn't they sort out the route-following functions? When you also take the high price into account, this deficiency is terribly glaring. Fear not though, if you're a Navionics fan...keep reading to the end, because Navionics makes a special appearance later on.
Memory-Map (Free)
This App is the first of two covered here which do
not include charts. The other is iNavX, reviewed below. However, this App is free, while iNavX is a paid App. The objective of
Memory-Map is to get you into an online chart store (
Digital Map Shop) and spending money. However, it's not a cynical exercise: the App has excellent functionality, provided you're prepared to invest modest time and effort in getting to know it. In addition, if you want to use your iPad for shore-bound navigation, Memory Map also works with OS 1:25,000 maps, among many others.
The instructions (annoyingly, only available online, albeit via a link from within the App) are clear enough, if unattractively presented as a large slab of text. Buying the charts from within the App is also easy, and competitively priced - about £25 gets you the Admiralty Raster Charts - yes, all 800 of them - for the UK and Ireland. Be aware that when you first purchase the UK & Ireland pack and download it, all you seem to get is a single chart covering the whole of the UK and Ireland. You haven't been conned - you need to zoom in to the area you want the detailed charts for, and then click on the charts button and select 'More Charts" from Digital Map Shop to access the individual chart downloads.
The store is actually selling you a subscription - so you can delete charts from the iPad, and download them again, or indeed download further UK or Ireland charts, without paying again. Meanwhile, the ones that you have downloaded are cached and are therefore available on the iPad's memory for all eternity, whether or not you have an internet connection and regardless whether you opt to pay for updates later, when they become available.
Do note, however, that the UK and Ireland pack is the only pack of marine charts available in Digital Map Shop. If you want to undertake, say, a Channel crossing, you will only be able to access the Channel charts (for example, the Central Channel for a crossing from the Solent to Cherbourg). There appears to be no facility to obtain the detailed charts for the French coast or any other foreign destination.
Let's start with the "iChart comparison." The GPS location symbol isn't especially elegant, but it is big, red and clear. That's good enough for me.
Recalling that the Memory-Map App is running Admiralty Rasters - my favourite - let's get one piece of bad news out of the way early on: the charts are not interactive. You cannot click on a tidal diamond and pull up a nice curve and tide table, as you can in the Vector charts in Navionics HD or the (overlaid) Imray Raster charts. There's nothing to click on. It's annoying, but will come as little surprise to anyone who had been using Admiralty Rasters on Mac-based equipment for any length of time. The only solution - which I've worked with for years, so it doesn't feel like a big deal to me personally - is to use a separate tides app or go online and use
Admiralty Easytide (my usual port of call). It's free of charge for predictions up to 6 days ahead, and beyond that, I use an almanac. If I've got a race coming up, like the RTI, I pull out the almanac and get the standard port tide times well in advance, so that I can mark-up the tidal atlas (scanned into PDF) and start thinking about strategy (uptide/downtide), which won't be finalized until we get the wind forecasts in the immediate run-up to the event. Then, within the 6 days before the event, I go onto Easytide and get the prediction curves for all locations where the boat might end up going on race day, and paste them all into a Word document before converting it to PDF. It's never really felt like an imposition, more like part of the satisfying task of working up the tac/nav and warming up my brain for the event.
But if that sounds like too much work, the standalone
Imray Tides Planner App is pretty good, and the curves in my experience compare well with the Easytide curves, as well they should, being licensed from UKHO. They also provide extra functionality, compared to their Easytide cousins, as I describe above in the section on the Imray navigation App. Apps such as the Imray Tides Planner can work well, but beware of competitors (often hailing from the US) that produce suspiciously smooth, harmonic curves almost like sine waves. If you've ever sailed in the Solent or Poole Harbour, you'll know they must be nonsense.
Anyway, in-chart tidal data either is or isn't a big deal for you. Assuming it isn't, the rest of the news about the Memory-Map App is all pretty good. Inputting waypoints and creating routes is quick and easy. To create a waypoint, you simply tap on the Flag+ button on the toolbar, and a new waypoint appears as if by magic. As the shot below demonstrates, the new waypoint has two buttons: a blue arrow button, which opens a pop-up menu; and a green drag button. Tap and hold on the green button, and drag the waypoint to where you want it.
Let's say you want to create a route. To do this, having created the first waypoint as shown above, you tap on the blue drop down arrow and select CREATE ROUTE from the menu that appears. Here's our old friend the Swash Channel once again.

The first waypoint turns into a blue dot. You then just tap once to create each new waypoint, one after another, until your route is constructed. Each blue dot behaves just like a waypoint - if you tap on it, the same choice of a blue button and a green drag button appears - in the latter case, allowing you to drag the point around with your finger or stylus until it's in a position you're happy with. The route appears as a bold, dark blue line, and is clearly visible on the screen in broad daylight. There's an option to change both the colour and the line style if you wish.
To follow the route, the route, select the first waypoint and tap on the blue menu button, then select FOLLOW ROUTE on the pop-up menu that appears.
And praise be, the App starts following the
entire route, from start to finish, with no further user input is required. All you have to do is get to each waypoint, or within a preset proximity of it, and the route navigation automatically flips on to the next waypoint in sequence. I mean it's not hard, is it? Why can't Imray and Navionics do this, when a free App running twenty-five quid's worth of charts can do it that easily?
That's not all. Once you've activated the FOLLOW ROUTE function - or the GOTO function if you just want to navigate from where you are to a single waypoint - the Memory-Map App serves up a positive cornucopia of navigation data. This is so impressive that I am going to leave my kitchen now and jump on to
Arabella for a sail, just so that you can see this function in action in the real world. Here we are, sailing up to the first waypoint of a simple route that I've created to take us down Southampton Water to the BP Hamble Oil Terminal jetty. (I've deactivated the track function, by the way, to declutter the image).
You may have to squint a bit, as the image is not full-size, but you can make out on the chart that, as we sail towards the first waypoint, it's just off the port bow. Sure enough, the big arrow on the screen is pointing that way, telling us which way to steer, and there's a countdown timer in the bottom left corner of the screen (R2P1 stands for Route 2, Point 1). It's not clear from this screenshot, but when we pass the first waypoint, the route will automatically flip on the second, and so on until the route has been completed. There's no necessity for the user to select the next waypoint and tap on GOTO.
Click the arrow button in the toolbar, bottom right, and the screen flips to provide a vast amount of data, like this. So much so, in fact, that I'm trying to work out how to populate some of the fields. But clearly, even the basic default set is pretty good. More impressive still, each of these fields can be customized.
Not only can you resize each field (both large and small options appear in the shot above), but you can also select from a wide range of data with which to populate the fields. Tapping and holding each field opens up a menu button which, when clicked, launches a lengthy list of data options, like this. Bear in mind that on this screen, you're only seeing a very small selection of the data available - the menu seems to scroll on and on forever.
It's difficult to imagine what further data the average user could possibly want, unless they were a dedicated racing tac/nav and required the functionality of software costing many, many times the price of this App
and charts.
Finally, routes, waypoints and other data may be emailed from within the App for use in other programs. For example, here's a route created in Memory-Map...
..and here it is opened in Google Earth on my MacBook Pro, after having been emailed. As I explain later, you can use this handy feature to swap routes, waypoints and tracks between different nav Apps on the iPad.
Verdict: The Memory-Map App is a truly excellent, competent product, representing real value for money. It's straightforward to use, with just enough preference settings and options to describe it as customizable. Route-creation and route-following are ridiculously easy to set up, yet provide a tremendous range of route data. You can also import and export GPX files (via email). A really strong product at this price point, with just a few minor niggles. The instruction manual should be a help file within the App, not online, and the absence of in-App access to tidal data will annoy some users. Moreover, if you want to go foreign, the fact that only UK and Ireland charts are available will mean that you need to look elsewhere for detailed charts for your destination. On the other hand, the fact that this App may be used with OS and other types of map - available from the Digital Map Shop - does give it a degree of flexibility that is absent in the other Apps reviewed here. If this were a magazine review, the Memory-Map App would get the "Best Budget Buy" stamp of approval. If you're wondering why I say "Budget", there are two reasons. First, at a total cost of £25 (for the free App plus the charts), this is a very cheap option, but don't make the mistake of thinking it's a poor relation. Second, even this impressive App is surpassed by iNavX (below), if you don't mind spending a bit more money.
Important: do not buy the paid version of this App unless you're an existing user with compatible charts on your PC that you want to transfer onto your iPad. The transfer function is the only feature in the paid app that is not supported in the free version reviewed here.
iNavX
Like Memory-Map, this product necessitates acquiring the App and the charts separately. Moreover the App is paid, not free like the Memory-Map App, so the cost increases somewhat. However,
iNavX has significantly more features - it depends if you think you will use them. To acquire the charts, it's necessary to create a subscription (costing $10 US) at
X-Traverse. Once that is set up, you can buy and download your charts. In the UK, these will be Navionics Gold charts - specifically product 28XG covering the UK, Ireland and Holland. This is the same (vast) area covered by the proprietary Navionics HD charting app described earlier.
The subscription with X-Traverse is annual, and during that time you can download charts for each area comprised within 28XG as often as you like, so there's no need to keep your iPad's memory stuffed full of charts that you never use. Just download them as and when you need them - on a Wifi connection, this takes just a few seconds. The charts you do download are cached and therefore stored on your iPad for as long as you don't delete them, even if the subscription expires.
The combined cost of the App, the Navionics charts and the X-Traverse subscription totals about £75 at current exchange rates - about three times the cost of Memory-Map, albeit including a greater chart area as well as the additional features discussed below. One additional feature you don't get is the ability to get tidal data from within the App, despite the fact that the Navionics tidal diamonds are present and correct. Tapping on them gives you nothing, which is kind of annoying. After all, they work in Navionics' proprietary App, as I described earlier. In fairness to iNavX, tidal data can be accessed from within the App if you also buy and download
Ayetides XL, which will integrate with iNavX. However, Ayetides does
not include UK tidal data. If you poke around their website, you will find a lengthy justification for the decision to exclude it. Make of it what you will, the fact remains that if you're sailing in the UK, you won't get tidal data from within iNavX. You'll have to use an almanac or use a separate App such as the standalone
Imray Tides Planner App.
First up, the inevitable "iCharts comparison". Good news - this is easily the most visible GPS location symbol yet, and can be customised for size and colour if required. Ignore the purple symbol off-centre in this screenshot, by the way - it's an AIS target. More on that below and in a later post.
Creating waypoints is easy and intuitive. First, tap on the chart in the approximate location of the desired waypoint. A menu pops up (note that an arrow incorporated in the shape of the menu box points to the precise spot you have selected). Tap on the Waypoint button in the upper right corner of the menu box.
A new waypoint appears, as shown below, as a little green point labelled with a waypoint name. It's auto-numbered as WP0001, but you can edit the name.
Moving waypoints around, once created, is simple. Tap on the waypoint, and its label turns grey, as shown in the screenshot below. Then hold and drag it to the desired new location.
Creating a route involves selecting the waypoints that you want to link together. Tap on the Routes button on the bottom toolbar, and start picking your waypoints. Here, I'm in the process of choosing the two waypoints shown on the chart above.
When you're all done, select the route and it will appear on the chart as a dotted line joining the relevant waypoints, as shown in the following shot.
Click GOTO in the routes menu, and off we go. The active leg - in this case from my kitchen table to the first waypoint on the route - appears as a solid line, while the remaining legs remain dotted lines.
Note the red circle around the waypoint to which we're navigating. This is a proximity circle. Once we enter it, the App will flip over to the next waypoint, and the next leg of the route will become the active route. You can set the size of the proximity circle (or not have one at all, meaning you have to hit the active waypoint precisely before the next leg of the route becomes active). In the shot above, the circle is set to the smallest size (0.5 NM). It looks huge within the confines of the River Thames, but out in the Solent, say, it's fairly modest.
There is an import/export function for routes, tracks and waypoints. This can be done either via X-Traverse or simply by emailing them. Here, for example, is the above route emailed from the in-App import/export menu and opened in Google Earth.
And here it is, having been uploaded to X-Traverse, viewed in Google Maps on the X-Traverse website.
And finally, here it is having been opened on the iPad in the Memory-Map App (just open the email, tap on the attachment file, and select 'Open in Memory-Map'). This is a nice illustration of how the two Apps can share GPX files, if you use them both - remembering that Memory-Map can also export these files by email.
Taking this out into the real world, here we are actually navigating down Southampton Water, so you can see it in action. Our GPS location is centred on the screen and we are following the solid blue active GOTO line, which is taking us to Waypoint 0001 - the start of the route, which appears as a dotted line.
Clicking on the Instruments button on the bottom toolbar calls up the data screen. Across the top is an electronic 'compass', on which the bearing to the waypoint appears as a red spot, centred, and our course appears as a black triangular pointer. Just in case there's any doubt which way to steer, a red arrow appears at the right-hand end of the scale, telling us to steer to port. The data fields are self-explanatory.
This instruments screen can be scrolled down to show considerably more data than is shown here. A
full list is available on the iNavX website. Crucially, this includes not only the obvious navigation data but also any NMEA data that can be mulitplexed to the iPad wirelessly from the ship's onboard systems, as I describe in a separate post.
The capacity to receive, process and display external NMEA data is one of the major functional advantages of iNavX over Memory-Map. The other is the ability of iNavX to download and display on the chart a variety of GRIB files. Weather can be obtained from X-Traverse at no extra cost once you have paid your $10 US susbscription, but they are quite large scale, and can be bettered if you need GRIBS for a particular location - the Solent, say, where wind conditions can be highly localised. Most often, these require some kind of subscription to be set up (for example,
PredictWind), although there are free sources which can be tracked down on the internet. Regardless, if you can get a GRIB file onto your iPad - most often by emailing it to yourself after downloading the file onto your home computer - iNavX will open and display it.
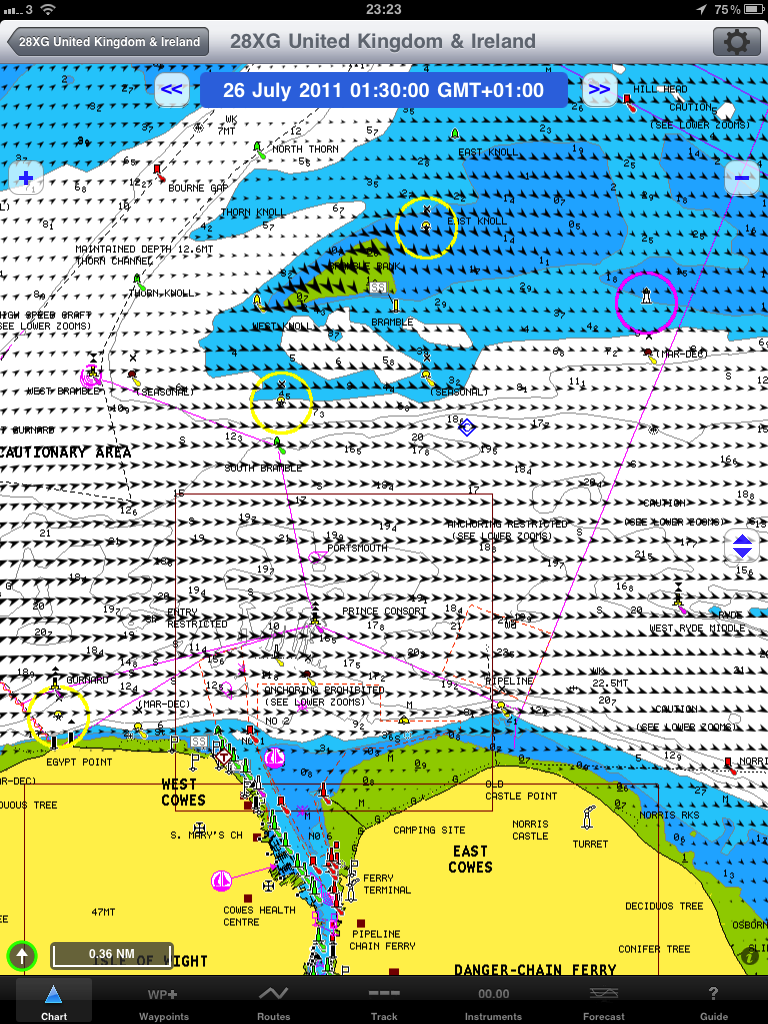
The fact that GRIBs predominantly show wind direction and strength does not mean that wind is the only thing they can show. For example,
Tidetech provides very detailed tidal GRIBs for specific regions. They can be seen in Tidetech's own online viewer, and printed off to create a tidal atlas for a given region and date. Or they can be downloaded, in which case they can be opened in iNavX. Assuming you have emailed the GRIB to yourself, tapping on the attached file in the email will pull up a menu which includes the option to open it in iNavX. Once selected, this transfers the file to the App, where tapping the Forecast button on the bottom tool bar will open a screen from which the relevant GRIB can be opened. A typical Tidetech GRIB will appear like this.
If you think this all looks a little confusing, I'd agree. The trick is to zoom in, once you've looked at the general picture above and got an idea of where the main tidal flows are - everything then becomes clearer, like this.
Note the date and time display at the top of the screen. This is the date and time to which the prediction applies. Clicking on the FF and REW buttons on either side of it allow you scroll forward and back in time, to see how the tidal situation will change.
And here, in contrast, is a typical free wind GRIB imported from X-Traverse from within the App. As you can see, it's inadequate for coastal cruising.
On the other hand, here is the PredictWind 1km GRIB for the same date and time - viewed here in PredictWind's own website viewer, but also capable of being downloaded (provided you have a Windows PC) and then emailed to yourself to open in iNavX on the iPad. Quite a difference, isn't there?
It's beyond the scope of this post to go into detail on whether GRIBs, especially high-res GRIBs such as those supplied by PredictWind, can be trusted. For a good discussion on the topic, I recommend
this page on Frank Singleton's website, together with the links from it.
To my mind, it's not clear beyond all doubt that being able to load GRIBs into iNavX is all that big a deal in terms of day-to-day practical use. For sure, when cruising or racing offshore, the ability to download GRIBs is seen nowadays as a material issue, because viewing GRIBs in a browser in such circumstances is neither cheap nor all that easy. But in the kind of coastal cruising that, I suspect, most users will be undertaking, it seems viable to make use of the 3G connection in areas where mobile network coverage is good. In addition, I quite frequently download the PredictWind screen for each hour that I'm going to be out for, and save them together as a PDF that can be printed and/or saved to disc for viewing offline. Tidetech takes that idea one stage further by actually allowing you batch together all of the screens for the hours you require, and saving them as a PDF for you - in essence allowing you to create a dedicated tidal atlas that you can print or save for later use offline. Nevertheless, for those who want or need it, the built-in GRIB overlay will be an attractive function in iNavX.
Verdict: You'll pay three times the price of Memory-Map for a larger chart area, GRIBs and the capacity to link to NMEA and AIS data - but by virtue of these additional benefits, iNavX will probably win over more demanding users. It does mean committing to Vector charts, however. In every other respect, iNavX is as quick and easy to use as Memory-Map. It takes longer to get the hang of it, but once you have, it's very intuitive and flexible. The absence (in the UK) of in-App tides is a bugbear but without a doubt, this is a great offering and the premium product currently available.
Conclusions:
iChart is too expensive by comparison with Memory Map to justify choosing it. Not only does Memory-Map cost less, but it offers considerably more functionality. If Admiralty Rasters are the be-all and end-all for you, then Memory-Map is likely to be the one you choose.
Imray and Navionics HD are elegant products - and, alone among the group tested here, they include built-in tidal data (albeit at the cost of a buying the Tides Planner, in the case of Imray). However, that doesn't mean that tidal vectors are taken into account when computing a course to steer. Neither App operates as a fully-featured navigation app: route following is non-existent, and in the case of Imray there is a slight feeling of the developer having gone for style over substance. Disregarding the failure to incorporate tidal vectors, they are more-than-adequate passage planning tools, but that may not be enough to justify choosing them over the cheaper Memory-Map option. Likely to be the niche choice for users that have a special affinity for Imray or, in the case of Navionics fans, people who can't or won't pay the higher price of buying iNavX as well as Navionics charts.
Memory-Map and iNavX (in the UK) lack in-App tidal data - and both fail to take any tidal vector into account when computing courses - but otherwise they offer much more functionality than any of the other Apps reviewed here. A good standalone tides App is Imay's Tides Planner, although it doesn't integrate with either of these products. Memory-Map is especially good value for money, as long as you don't want the wider chart areas or additional features of the premium product, iNavX. By way of summary, both these Apps offer:
- Real time navigation on Raster (Memory-Map) or Vector (iNavX) charts
- Simplicity of creation for waypoints and routes
- Extemely clear and data-rich GOTO and FOLLOW ROUTE functions
- Comprehensive virtual instrument panels, showing a huge range of nav data
- Import and export capability for GPX files (and, in iNavX's case, other formats)
For the extra money, iNavX also offers the following features that are not available in Memory-Map:
- Charts for areas outside the UK & Ireland
- GRIB importing and viewing
- AIS and NMEA data viewing via wire-free connection to suitable hardware
For myself, I'm going to remove everything from my iPad except for Memory-Map and iNavX. Each of them is such such an excellent App that I can foresee using both at different times and in different circumstances. I'd love to see them add tidal vectors functionality, however.